Let light shine
Learn about the natural and artificial sources of light with this hands-on craft activity.

Overview
Light helps us see the world around us. Make your own stained glass craft and experiment with natural and artificial sources of light.
Instructions
What you'll need
- Laptop and projector
- "Light helps us see" slideshow
- "Stained glass" teacher instructions
Craft
Recommendation: teacher to prepare an example of the stained glass craft before class. This is beneficial because it shows the students exactly what they are expected to do.
- Wood craft sticks (or popsicle sticks), 4 pcs per student
- Optional: Use black construction paper if preferred
- Paint brushes, 1 per student
- 8.5 x 11” wax or parchment paper (used as contact paper) enough for the class
- Colored tissue paper ripped into small pieces or pre-cut to approximately 2x2” squares with paper cutter or scissors
- 1 container of watered-down white liquid glue per group of students (ratio 4:1 glue to water)
- Pour a small amount of glue into a small container (e.g. yogurt containers) and mix in some water until the consistency is runny. If the students are sitting in groups, 1 container of runny glue may be used per group.
- Newspaper or a disposable tablecloth to protect the tables
- Scissors
- Use a laptop and projector and open "Light helps us see" slides on the board. Start by asking students to think of ways light is important to us.
- It makes us feel good.
- It helps us concentrate and learn.
- It provides energy for plants to grow.
- It allows us to see.
- Explain how humans need light to see. In slide 2, illustration shows a bedroom with the lights on and the lights off. Imagine you lost your favourite toy in one of these rooms. Let students pick which room they would be able to find their toy (the one with the lights on). We need the light to travel from the lamp, reflect on the toy, and into our eye to see.
- In slide 5, explain that some light is natural, and some light is artificial.
- Natural light sources are found in nature. Ask students examples of natural light (the sun, moon, stars, lightning, jellyfish, fireflies - some animals light up naturally). Let students share their personal experiences (Example: ask “Have you ever seen a firefly light up at night? Have you ever seen a full moon?”)
- Artificial light sources are made by humans. Ask students examples of artificial light. Let them share examples from their personal experience. Some examples are: lights in the classroom, computer screens, the projector, light bulbs, lamps, flashlights, holiday decorations, glow sticks, TVs, phone screens.
- Refer to the diagram on slide 6. Show the path of light and how it travels to the eye.
- Have students imagine being outside looking at flowers in a garden on a sunny day. The sun shines its light on the flower. Light travels to the flower and “bounces back” to your eyes, which allows you to see it. This means the light “reflects” into our eyes.
- Let students think about trying to look at the same flower at night, without the sun. It becomes much harder to see the flower. This is because there is a lot less light.
Craft activity
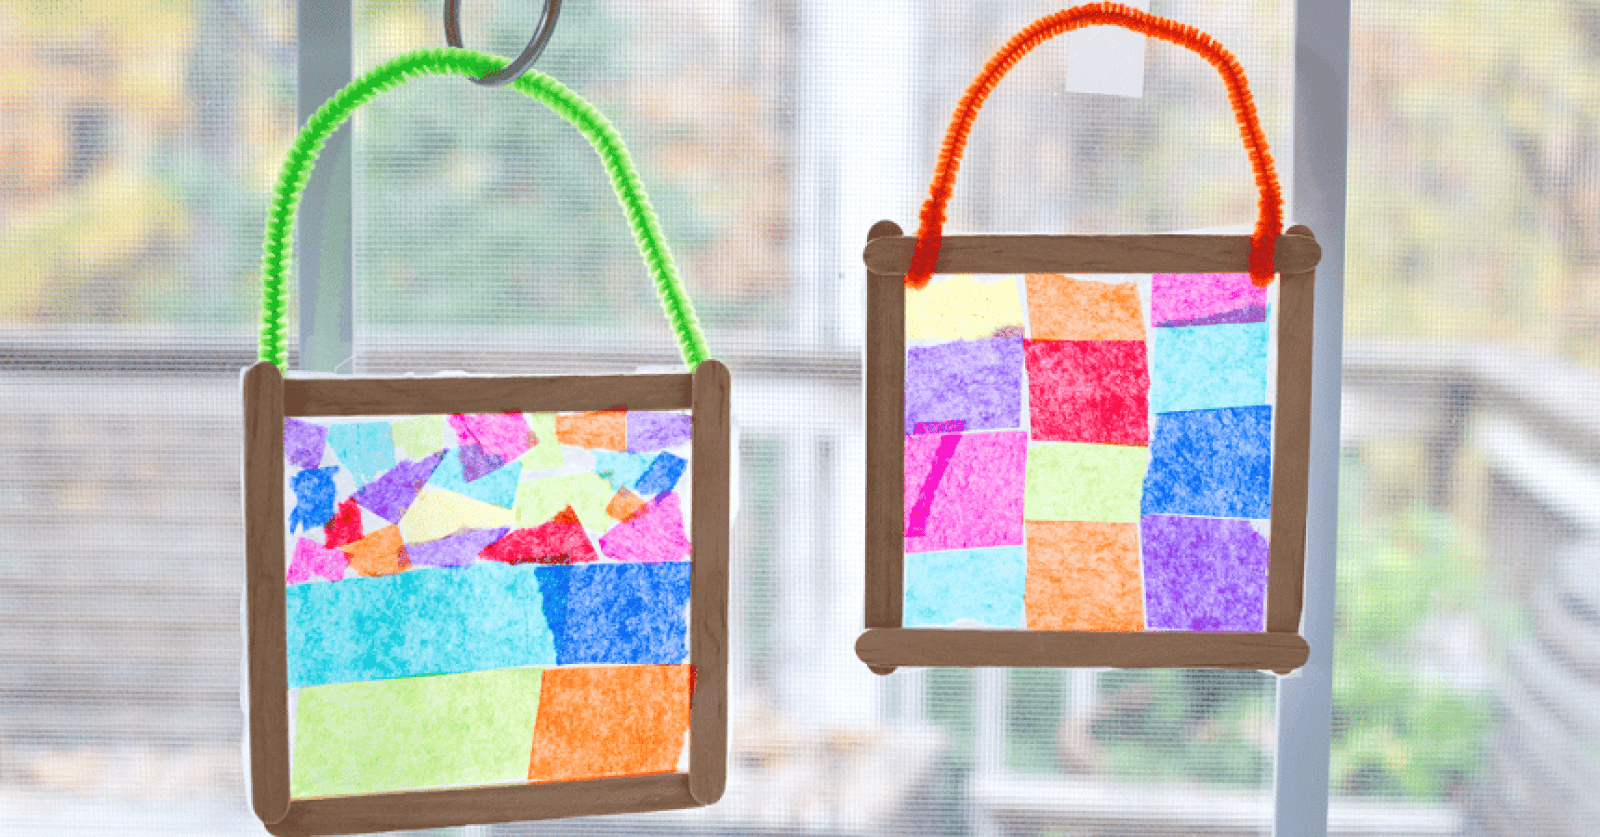
- Start by showing a ready-made example of the stained glass craft. Optional: you can pass the ready-made example around the classroom.
- Hold up the craft against the window to show natural light shining through.
- Hold up the craft against the light from the projector to show artificial light shining through.
- Use body language to show the path of light traveling from the sun, “bounce off” or reflect on the coloured paper, and into our eyes.
- Ask students “what does it mean for light to “bounce off of things” to let us see? Ask students to say the new word out loud together: reflect.
- Lay down newspaper or a tablecloth to protect the students’ tables.
- Hand out 1 stained glass stencil per student. If they are sitting in groups, hand out 1 container of cut-up or ripped up tissue paper per table and 1 container of watered-down glue per table. The colours can be mixed up in the container. Hand out 1 paint brush per student.
- Give each student a piece of wax or parchment paper.
- Use the paint brush to brush a thin layer of runny glue on the wax or parchment paper. Ask students not to use too much glue because it will cause the wax or parchment paper to rip. Explain that it’s okay when problems happen. Stay positive because there is always a way to find a solution! If the paper rips, use a small piece of dry wax or parchment paper to seal up the tear.
- Ask students to be creative and attach different colours on the wax paper. The different pieces of tissue paper may overlap. Continue doing this until the entire square is covered in coloured tissue paper. Here are some possible variations that the teacher may suggest:
- Students may rip the paper into different shapes. Use a mixture of small pieces and bigger pieces.
- Students may use a combination of squares and ripped pieces.
- Students may overlap different colours to make new colours, example: pink + blue = purple
- Students may create different shapes, example: hearts, stars
- When students are done, ask them to cut out the stencil. Glue the stained glass pattern onto the back of the stencil. Allow the glue to dry for at least 4 hours.
- Ask students to gently hold up their crafts against the window and again use the light from the projector or the lights in the classroom.
- Wrap up by asking students to explain in their own words how light travels and reflects, and what they observe about their stained glass art. Optional: Ask students to write their names on their craft. You can make a display of everyone’s craft by sticking it against the window.
Modify or extend this activity
Talk about energy conservation
Just like we don’t want to waste food or water, we should try not to waste energy either. To save energy, sometimes we can choose natural light instead. When might we be able to turn off the artificial lights and use natural light instead? Examples could include opening the blinds or curtains to let daylight in, or going outside to play instead of staying inside with the lights on.
Talk about how plants grow in the direction of natural light (the sun) and artificial light (greenhouses)
Have the students plant seeds. Place some seeds close to the window and others near artificial light to demonstrate how plants grow towards the light.
Share stories about the Sun and Moon from around the world
Check out this NASA Night Sky Network resource for stories about Moon from around the globe.
Curriculum Fit
Grade 1 Science
Content
Light and sound can be produced and their properties can be changed
- Natural and artificial sources of light and sound
Curricular competencies
Questioning and predicting
- Demonstrate curiosity and a sense of wonder about the world
Processing and analyzing data and information
- Sort and classify data and information using drawings
Evaluating
- Consider some environmental consequences of their actions
Communicating
- Communicate observations and ideas using oral language
Assessments
- Assess students’ understanding of the importance of light to humans, animals and plants.
- Assess students’ ability to sort light sources into two categories: natural and artificial.
- Assess students’ communication by sharing ideas and listening to others.
Teaching Notes
Background information
There are 2 types of light sources: natural and artificial.
- Natural light sources can be found naturally on earth. Examples include: the sun, stars, moon, lightning, jellyfish, and fireflies.
- Artificial light sources are made by humans. Examples include fire, lightbulbs, flashlights, lighters, fireworks, glow sticks, lasers, TVs, and phone screens.
There are artificial and natural sources of energy such as fire. Naturally occurring fires can come from volcanic eruptions or lighting strikes. Artificial sources of fire are human-caused forest fires, campfires, gas fireplaces, gas-burning stoves.
Connection to Two-Eyed Seeing
Suggested Reading Resource
- Strong Stories Coast Salish: The Sun and Moon by Celestine Aleck and Cole Good. Synopsis of story: “In this Coast Salish story, to help make their children happy, the sun and the moon make the difficult choice to part from each other. The Creator allows them to visit only at the time of an eclipse and at sunrise and sunset. The great love between the sun and the moon can be seen in the beauty of those times.” (Source: Strong Nations Publisher)
- The sun and moon are both important celestial bodies to Indigenous Peoples because they connect people to each other through the passage of time, and to nature and the environment.
- Since the moon does not make its own light, its glow comes from the reflection of sunlight. Moonlight not only helps some animals hunt in the night, but different phases of the moon affect how animals behave and communicate with each other at night.
- Suggested Reading Resource: Mi’kmaw Moons, by Cathy LeBlanc and Dave Chapman.
- Mi’kmaw Moons follow lunar phases and are connected with nature, and are in sync with the solar cycle Reference of relationship of moon to nature (Source: skynews.ca)
- The solar cycle gives us seasons in North America.
- Mi’kmaw Peoples closely observed the moon to tell them when the cod were spawning, types of berries ripening, and when birds would lay their eggs.
Light helps us see the world around us
- Reflection: when light “bounces off” an object. Imagine you have a shiny mirror. When you shine a flashlight on it, the light bounces back to you, and you can see your reflection in the mirror.
- Natural light can benefit our health and save energy
- Helps improve mental health.
- Improves sleep.
- Increases ability to concentrate and learn.
- Helps our bodies to produce Vitamin D which helps us build and maintain teeth and bones and absorb calcium.
- Saves energy as we can turn off the artificial lighting.
- Natural light helps animals and plants
- Sunlight helps plants on land and in the ocean grow and make food.
- Moonlight helps some animals hunt better at night and communicate with each other.
- The moon and earth are connected with each other through gravity. The moon’s gravitational pull on the Earth causes the ocean to have tides. Refer to this video to understand how the moon exerts a gravitational pull on the oceans to create tides.
- Tips to increase natural light and conserve energy
- Keep blinds or curtains open to let in the natural light.
- Decorate with bright reflective colours and/or use mirrors.
- Get outside and exercise.
- Refraction: light tends to “bend” when it passes through one material to another. Think about a pencil that is sitting in a glass of water. Light traveling through the air refracts (bends) when it hits the water. This can make the pencil look bent at the surface of the water.
Making light and colour more accessible for all
No two people likely experience colour the same way. Approximately 5% of the population have some form of colour blindness, which means those affected may have difficulty distinguishing between two hues, such as red and green, or blue and yellow, while others cannot distinguish between hues at all. To address this, it is best to explore many complimentary colours when working with arts and crafts. Complimentary colours are a pair of colours that appear on opposite sides of the colour wheel, and through art, we can make this experience more accessible by exploring complimentary colours which create tonal contrast for all regardless of how colour is perceived.


