Winter ConducDough Circuits
Squish, shape, and light it up! Learn all about how a circuit works by building one with conductive playdough and LED lights.


Overview
Explore the science of electric circuits through a hands-on building challenge. Use conductive dough to create and test circuits, investigate how electricity flows, and experiment with components such as LEDs as you design your own working circuit.
Instructions
What you'll need
- Conductive playdough - consider making batches of different colours
- You can make your own using household ingredients with the attached recipe.
- Playdoh that contains salt is also slightly conductive and can work, too.
- Other decorative items such as beads, popsicle sticks, pipe cleaners, or googly eyes
- Insulating craft materials such as paper, cardboard, popsicle sticks, etc.
- Optional: insulating playdough - you can follow this recipe to make it
Per student:
- 9V battery
- 9V battery clip - note that the clips can be difficult to remove from the battery and may sometimes break battery terminals off. Remove carefully.
- 5mm LED lights
Safety first
- This creates a real, live, circuit. If it gets hot, remove the battery for a few minutes.
- There are lots of small pieces that are considered choking hazards.
- Do not touch both wires of the battery pack together while clipped to the battery.
Preparation:
- Make a few batches of conductive dough using the Conductive dough recipe card in a few different colours
- Decide how you will distribute dough to students and prepare accordingly
- Prepare decorative materials for students
- Prepare insulating materials for students or make insulating dough using this recipe
Testing the circuit with 2D designs:
The Winter ConducDough Circuits slideshow contains visuals to help walk through the following steps.
- Slide 2: Review basic light circuit structure with students - electricity needs to flow from a power source through a conductive material (such as a wire, or in this case, playdough), through a light, and back to the power source.
- Note that in the case of an LED light, the direction that the electricity flows is important. The positive terminal of the battery must connect to the positive leg of the LED
- Note that in the case of an LED light, the direction that the electricity flows is important. The positive terminal of the battery must connect to the positive leg of the LED
- Slide 3: Start by reviewing the materials with the students.
- Notice the 9V battery clips have two wires: a red and a black. Red connects to the positive terminal of the battery and black connects to the negative battery
- Reiterate that once the battery clip is clipped onto the battery, electricity is flowing and they are not to touch the wires together.
- Explain that the dough is conductive, which means electricity can flow through it, just like the wires. Our goal today is to use that dough creatively to design circuit paths with cool designs and create light up art models.
- Have students look at the LED light and identify the longer leg (positive) and shorter leg (negative). Tell them that they can separate them into a V shape, but to remember which one was longer.
- Slide 4: Create a demo circuit and have students follow along:
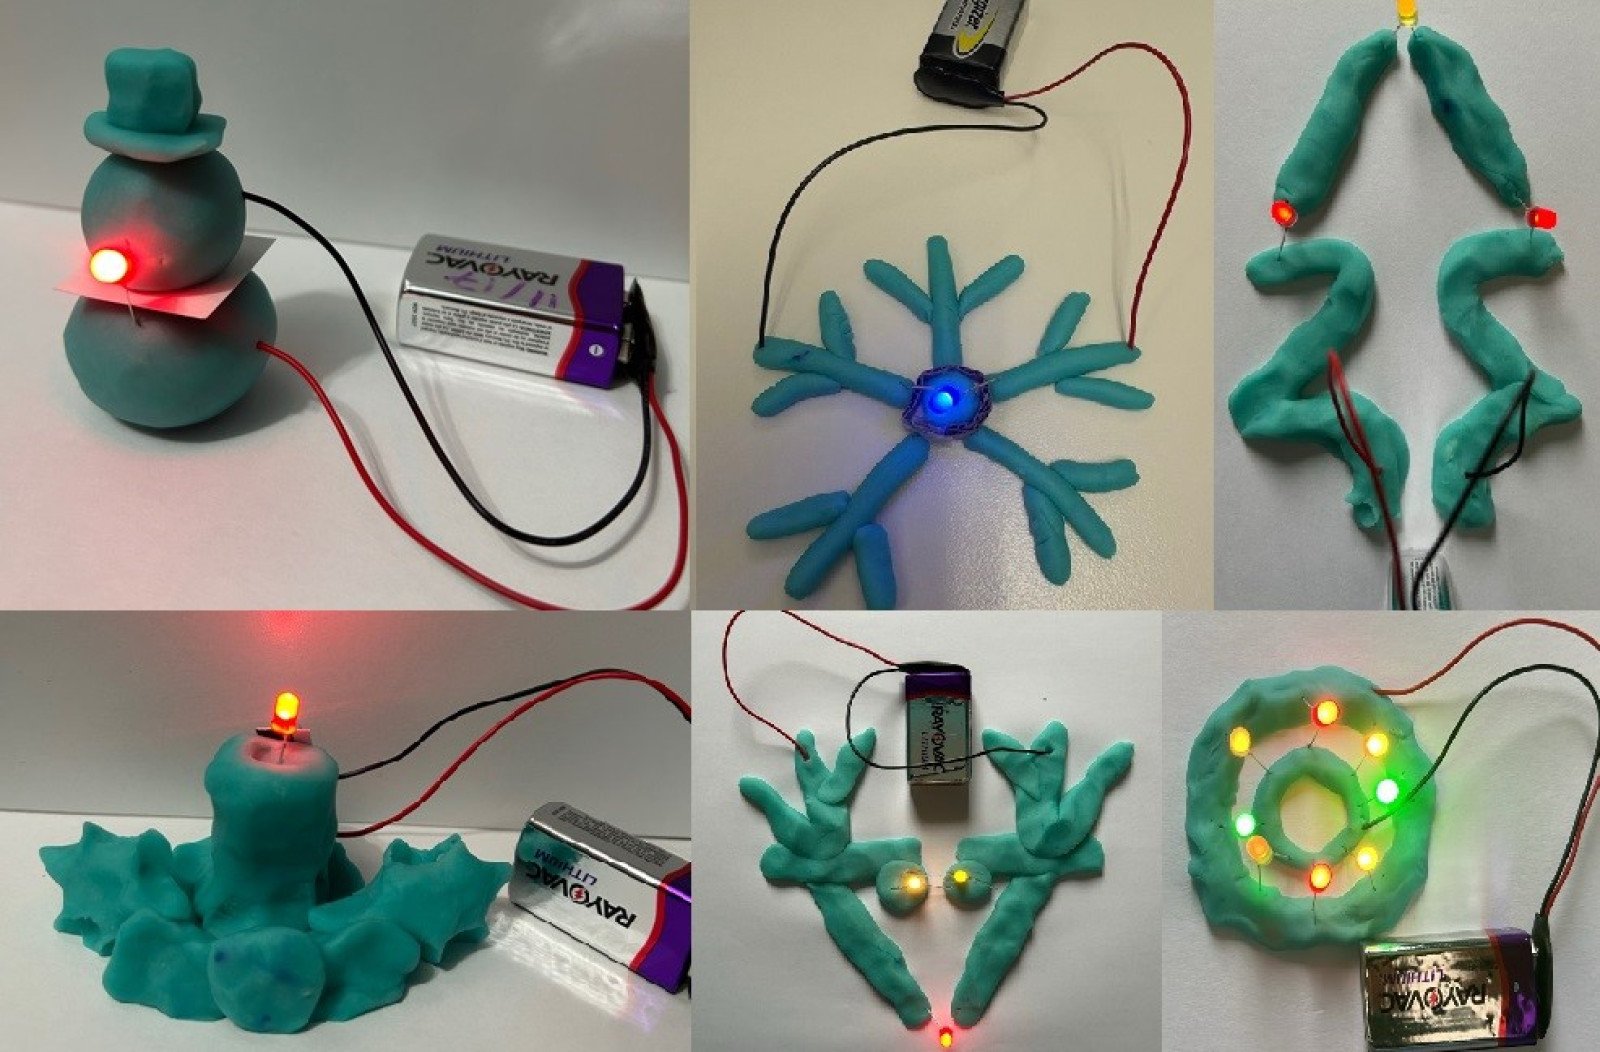
- Have them create the outline of a reindeer’s head using playdough, ensuring that there is a gap between the two halves. Place an LED at the point of its nose with one leg in one half and the other leg in the other half.
- Connect the positive wire of the battery clip somewhere in the playdough on the half of the design that the long leg of the LED is in. Connect the negative wire of the battery clip somewhere in the playdough on the half of the design that the short leg of the LED is in.
- Confirm that they have all successfully lit up their lights. If they don’t light up, have them swap the wires and check that the two playdough shapes aren’t touching.
- Slide 5: Ask students to predict what will happen if the playdough shapes connected. Have them test it out and explain that this causes what’s called a short circuit. In this case, the electrons traveling through the circuit are looking for the easiest path back to the power source and they end up travelling through only the playdough and skipping the LED light entirely.
- Slide 6: Give students time to experiment with different designs and including other decorative materials (such as beads). Parallel circuits will work the best – ie. Ensure that there are two halves of the design and one half contains all the positive sides of LEDs and the other half contains all the negative sides of LEDS.
- While series circuits will work (such as the Christmas tree example) some voltage will be used up with each light and so they might not be able to power as many lights as they want to.
When doing a design like this help them to see that:- Each light bulb becomes a part of the path itself. When looking at the Christmas tree example note that the path becomes red wire – playdough – positive leg of red LED – negative leg of red LED – playdough – positive leg of yellow LED – negative leg of yellow LED – playdough – positive leg of red LED – negative leg of red LED – playdough – black wire
- While series circuits will work (such as the Christmas tree example) some voltage will be used up with each light and so they might not be able to power as many lights as they want to.
Expanding the circuit with 3D designs:
- Slide 7: Take your exploration further by encouraging students to create 3D designs that incorporate lights. To do so, first introduce the concept of an insulator: a material that electricity cannot flow through.
- Slide 8: Explain that insulators will help prevent short circuits in 3D designs by blocking the flow of electricity and forcing it to flow through the lights. Consider the head and the body of a snowman. When building this, you can’t easily keep them from touching. But if you put an insulator in between them and one LED leg in the head and the other LED leg in the body, the electricity is now forced to travel through the light.
- Slide 9: Some designs all it takes a strip of paper hidden on the back of the design with a playdough glob to help create the circuit. See what kinds of designs your students can come up with and encourage the use of decorative items like beads!
Share your design
We would love to see the designs that your students come up with! You can send pictures to schools@bchydro.com
Curriculum Fit
On this tab you'll find all connections to the BC curriculum as well as our brief suggestions for assessment.
This activity links to the curriculum in the following areas. You can find more details below.
- Core Competencies
- Grade 4-7 Science
- Grade 3-9 ADST
Core competencies
Communication
- Focusing on intent and purpose
- Working collectively
- Supporting group interactions
Thinking
- Designing and developing
- Creating and innovating
- Generating and incubating
Personal and Social
- Identifying personal strengths and abilities
- Building relationships
- Resolving problems
Grades 4-7, 9 Science
Big ideas
- Energy can be transformed (Gr.4)
- Machines are devices that transfer force and energy (Gr.5)
- The electromagnetic force produced both electricity and magnetism (Gr.7)
Content
- Energy has various forms (Gr.4)
- Devices that transform energy (Gr.4)
- Power – the rate at which energy is transferred (Gr.5)
- Properties of simple machines and their force effects (Gr.5)
- Mixtures: separated using a difference in component properties (Gr.6)
- Electricity generated in different ways (Gr.7)
- Electromagnetism (Gr.7)
Curricular competencies
Questioning and predicting
- Identify questions to answer or problems to solve through scientific inquiry (Gr.4-7)
Planning and conducting
- Safely use appropriate tools to make observations and measurements, using formal measurements and digital technology as appropriate. (Gr.4)
- Use equipment and materials safely, identifying potential risks (Gr.5-6)
- Ensure that safety and ethical guidelines are followed in their investigations (Gr.7)
Evaluating
- Demonstrate an understanding and appreciation of evidence (Gr.4-Gr.7)
- Identify some simple environmental implications of their and others’ actions (Gr.4-5)
- Identify some of the social, ethical, and environmental implications of the findings from their own and others' investigations (Gr.6)
- Consider social, ethical, and environmental implications of the findings from their own and others' investigations (Gr.7)
Applying and innovating
- Co-operatively design projects (Gr.4-7)
- Transfer and apply learning to new situations (Gr.4-7)
- Generate and introduce new or refined ideas when problem solving (Gr.4-7)
Communicating
- Communicate ideas, explanations, and processes in a variety of ways (Gr.5-6)
- Communicate ideas, findings, and solutions to problems, using scientific language, representations, and digital technologies as appropriate (Gr.7)
Grades 3-8 ADST
Big ideas
- Designs grow out of natural curiosity (Gr. K-3)
- Skills can be developed through play (Gr. K-3)
- Designs can be improved with prototyping and testing (Gr. 4-5)
- Skills are developed through practice, effort, and action. (Gr. 4-5)
- The choice of technology and tools depends on the task (Gr. 4-5)
- Complex tasks may require multiple tools and technologies (Gr. 6-8)
Content
- Forms of energy (Gr. 6-7)
- Conversion and transmission of energy (Gr. 8)
Curricular competencies
Applied design
- Defining, ideating, prototyping, testing, making, sharing (Gr. K-8)
Applied skills
- Use materials, tools, and technologies in a safe manner (Gr. K-8)
- Develop their skills and add new ones through play and collaborative work (Gr. K-3)
Assessments
- Assess students' ability to construct a complete circuit and explain the components and flow of electricity throughout
- Asses students' ability to change their circuit layout while keeping it functional
- Assess students' troubleshooting skills by observing how they fix a circuit that does not work
- Assess students' creativity and design skills by reviewing their final creations
- Assess students' safety skills by observing how they handle materials and equipment
Teaching Notes
These teaching notes contain more information on the following topics:
- Materials
- Troubleshooting
- How conductive playdough works
- Key vocabulary
- Incorporating the engineering design process
- Additional resources
Materials
The materials for this activity are unique, but should be easy to locate at a reasonable price. Batteries, battery clips, and LED lights can be sourced at your local electronics store (we like to shop at Lee's Electronic in Vancouver) or Amazon.
Any playdough that has salt and water in it will be able to conduct some electricity. You can try different brands or make your own using simple household materials.
Troubleshooting
If the LED does not light:
- Check that the battery pack is secured correctly.
- Confirm that they circuit is set up properly ie. that the positive (red) wire from the battery clip is inserted in the section of dough with the positive (longer) LED leg.
- Make sure that the dough sections containing the LED legs are completely separated and not touching at all. When they are, it short circuits and the electricity flows through the playdough instead of being forced through the LED.
- Change the colour of the LED light (red and yellow require less to power on than other colours) or remove a light from the circuit (if you have multiple)
How conductive playdough works
Conductive play dough allows electricity to flow through it because it contains salt. When salt dissolves in the water in the dough, it splits into tiny charged particles called ions. Those ions can move through the dough and carry electricity with them.
When the legs of an LED are connected through the conductive dough to a battery pack, the circuit is completed and the LED lights up. This shows that electricity is flowing through the circuit. However, if the LED does not light up, it could be the case that there is a short circuit. This happens when the electricity can find a path through playdough only, and skip the LED lights altogether (ie. when playdough balls containing an LED leg are touching)
Key vocabulary
- Circuit: A complete path that allows electricity to flow.
- Conductive: A material that allows electricity to flow through it.
- Insulator: A material that electricity cannot flow through.
- LED (Light Emitting Diode): A small light that glows when electricity flows through it.
- Ion: A substance that helps conduct electricity.
- Short circuit: Occurs when electricity takes an unintended shortcut through a circuit. This often has very little resistance, causing too much current to flow.
Incorporating the engineering design process
Encourage students to think like an engineer as they build their circuits by engaging them with each step of the engineering design process.
- Question - What winter design do you want to create?
- Imagine - How could you build that out of playdough? Where will it light up?
- Create - Build your design using the materials available
- Test - Add the battery pack and test it out! Does it work? Do you need to change anything? Do you want to change anything?
- Repeat!
Additional resources (optional)
- Squishy Circuits
- Science World - Squishy Circuits
- Science Sparks - Playdough Circuits
Activity Materials
Select what you need below.

129.3 kb • pdf
892 kb • pdf